Logistical detail
Once I got permissions from the owners of the property, I decided to started to get some initial footage after i planned out the documentary. I started off with some initial raw footage that i may or may not use. I tested out getting my footage from a variety of different camera angles so i can sync them together. This is so when my audiuence watches my documentary, that they see it from different angles and perspective. I do this as i think it will make the documentary more entertaining as they see the footage from up close, far away, focused on the screen, over the shoulder. For the plan as seen in the pre production, I decided to split my documentary up into different chapters focusing on different eras in videogames. So with my plan i want to focus on making different chapters on different days. So say on the first day of filming, I will film the intro, the next day i might film the first chapter, the next day the second chapter and so on. Even tho each chapter will only run for about 2-4 minutes depending on what Im filming and talking about, I do expect some things to go wrong sometimes. As experienced on previous projects, the shots dont go right first time so i am Expecting it to have took multiple takes. Sometimes there could be bad lighting, the camera might not focus, the audio could corrupt, the angle of the camera might not turn out the way I anticipated. As a result of these things, i need to take in consideration that they may happen, so I have to plan out my recording schedule to give me more time than i need so i have time to do retakes.

In order to attend the filming days prepared, i made a list of all the pieces of equipment i needed to bring. The first bit of equipment i needed was my phone. This is so i could use the camera to film the footage. I use this as its small and compact and intuitive to use. Also it allows me to easily get the shot types i need from the respective angles. By adjusting the settings, it allows me to film in HD at 30 frames per second, however if i want it to look high quality, i can up that to 4K at 60 frames per second. The only downside of up-scaling the footage is that it drains the phones battery relatively quickly, so after a few hours i will have to recharge before use so it might prevent progress. I am going to prevent this by charging the night before i film.

The second piece of footage I used was a phone tripod. This was only £7 so it was relatively cheap for the filming budget. This was necessary for the filming of the documentary as it allowed me to take my footage and help maintain a still camera. This helped make my shots look smooth and still which will help make my shots to be less of an eyesore as the camera is in a fixed position. It helps me make shots that would be mere impossible to do freehand or via an extra person as a camera man as it would look very shaky and unpleasing to view and my audience wouldn't want to watch it. By using this I was able to get OTS shots, up close shots of the screen, a side angle of me playing games and the TV in the same shot. This helps me include a variety of camera angles and shot types by using my imagination to experiment with different shots. Then with the various camera angle s in my shots, i can sync them together so the gameplay smoothly switches between camera angles.
the last thing i needed is the videogame consoles themselves. This is a focus of what the documentary is about as I am showing how the videogame technology has evolved and how that affects young people and how that has changed them. For example has it made them happier, more confident. Some people associate a happy certain point in their life with a game they were playing at the time which helps them create memories and nostalgia. I will get footage for a couple of well known games from each console to be featured in the documentary. This footage will be played in the background of the voice of god while i use my voicew to talk about facts and statistics to help educate my audience on the subject. This will help make the documentary more entertaining.
Mis en scene
The shots I will be taking will be of me playing videogames. These will be taken from 3 or 4 different camera angles so I can sync them during the documentary so the camera switches between angles. This helps it be more entertaining for the audience because they are seeing the same footage from different perspectives. One shot i want to use is a close up of the screen so all you see on the camera is the gameplay footage of the screen. This is so you get a good look of whats on the screen before the camera switches to a wider shot. The second camera angle I want to use is a shot a bit further out which includes the TV as well as a bit of the desk. This is so the audience get a look of the gameplay on the screen, but also the scenery or more so what is on the desk. That way yo can see the console it is being used so it is believable to the audience that it is my footage. To decorate the scene i might include some other games on the desk next to the console. The third shot i want to use is an Over the shoulder shot (OTS for short). During the shots, Want to put things on the desk to decorate the scene up a bit. One thing i want to include is putting the console that I am using in the shot under the TV, as well I want to put some games on the desk for the audience to see which will liven up the shot so its not just a white desk and a TV. Having things on it will liven it up a bit better. In certain parts I will include interviews. These will include a medium close up which will include the persons face and the shot will cut off just below the shoulders. This is so the audience focuses on the person talking so they pay attention to what there saying. By doing a close up of one person in particular, this helps us draw our attention to them and nothing else so we pay attention to what there saying. The background during the interviews will be mostly plain but may include a poster just to liven up the background a little bit so it doesn't look bland and boring. Since these shots are indoors, I want to take these shots during the day in order to achieve the best lighting so make the shot look appealing and vibrant.
Controlling production
To help control production I made a list of the names and contact details of those who i would be using to help within the production of my documentary. This is so i knew who was going to help but also so they were informed. That way i could contact them to arrange meetup times so they could met me when i needed them for production. This helps me so i can plan ahead meetup times.
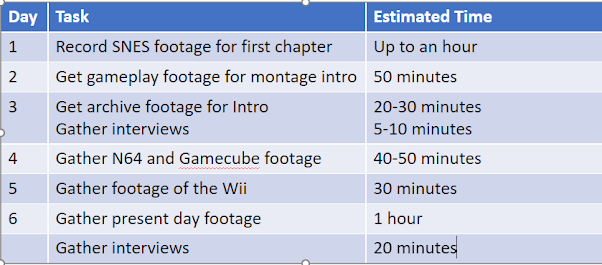
In order to efficiently plan out my time and make the most of every day, I made a recording schedule to plan out what shots I am gathering on what days. This means i come to my filming days prepared as I know what footage i am getting on what days. This made sure i was having good time management so no time was wasted. I made an effective plan so i could structure my filming across 6 different days and i knew to get a certain chunk of the documentary footage filmed during that day. Since it is a videogame documentary, I am segmenting the documentary into chapters as shown in the plan of my pre production creative elements section in to the eras of videogames to talk about how the technology has evolved and affected young people. So i am going to segment my filming up into the different chapters to get a chapter filmed each day. To ensure i would have enough time to film each section, i made an estimate on how long it would take me to film each chapter. And i give myself so much time as I am not expecting the shots to go right first try, so i am expecting it to take multiple takes. This is due to the lighting, audio, focus, shot size to not work out the way I intended it to do. So i want to give myself more than enough time so i can get each shot to perfection so it looks visually appealing for the audience and suits the clients requirements so it is suitable for their streaming platform and to their quality.
Risks during production


Once i checked the facility in which i was filming in i checked for any potential risks that would affect me my filming team during production. Weather they were minor or major risks, i needed to take them into consideration, discuss the likely hood of them happening and find any sorts of ways to prevent them if i can to prevent injuries. Since it is a safe indoor environment, it is very rare that anyone is getting hurt as they are no dangers nearby. The only problem is lone working as i can get all the footage myself so it is not necessary to include others as i can be more productive getting all of the shots on my own. Also other than the interviews in which i will include other people, non of my shots include other people so that is the only issue. However lone working doesn't really impact me as i am use to it, but if it was to be a problem, I am overcoming this by including others in my production by doing interviews
Filming
Day 1- Wednesday 19th April
For the first Day of filming, I wanted to gather the footage for the first chapter of My documentary. For this I wanted to get the footage for the Super Nintendo (SNES) portion of the documentary. This would include close ups of the console, me starting up the console which would show the audience what it looks like and how it works prior to gameplay. This is done to show the how different the technology is to a modern day console so they get an idea it was back then. I would then show gameplay of me playing a couple of the games. This will go over the top of my voice of God which will be my commentary over the gameplay explaining some facts and statistics about the console and how this impacts young people and how this technology impacted people differently from modern day.
One of the shots I got was a Shot of me insterting the Game cartridge into the console. This is a close up shot so the audience only see the console and game cartridge as this is the focus of attention in this shot as I'm drawing the audience as attention to the game that is being played. I then in this shot turn the console on via the switch which is why my thumb is in the way of this shot. This shot will come before the game play to show the audience how the console works. This will help educate the audience on how the console starts up and how this may look a quite different from modern day video games where they use disks or are digitally downloaded on the console already. I repeat this shot multiple times using different games
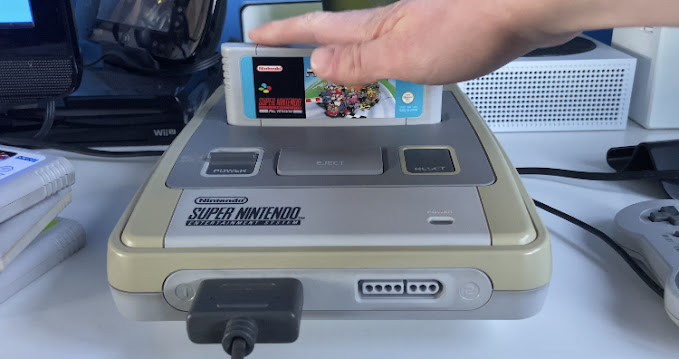
This shot is very much the same from the previous shot but with a different game. Also i was trying to experiment with using the previous shot but doing the shot further out and aiming the camera a bit higher and a bit of an angle so you see more of the console in the shot. I sort of like them both as the previous shot uses a sort of horizon line so the console is in the shot but you mostly see the game. I think this shot is a bit better detailed as you get a look into the mis en scene and things being put on display in the shot such as the stack of games to the left and a bit of the controller to the right.

For this shot I wanted to get a insert shot of me holding the controller while I play the games. So the audience will only see the controller and my hands pressing the buttons, But this will look way better when its switched between a shot of gameplay as you will see some other shots of me playing the games as a Over the shoulder shot r wide shot then it will swicth to this for a few seconds where it shows me holding the controller. Synchronising the shots will help make it look entertaining as it will show the same thing from 3 or 4 different camera angles and perspectives which will intrigue the audience as there seeing what they want to see from close up and wider further out shots.

This shot will be at the beginning of this scene and will show the controller being plugged in before the console starts up. In the shot< i hold the controller up to the camera so it can focus on it in high resolution so the audience get a good look at what it looks like., I then put the controller back on the desk and plug it into the console. This is done to show the audience that back in the day when video game consoles first came about, there was no such thing ass wireless controllers, and everything was hooked up by a wired connection. This helps to show them how the technology has evolved over the years.
I wanted to have a shot in the documentary where you actually get to see a young person in the documentary. This is so it is more entertaining rather than it just being gameplay on the screen. But this shot will show the Target audience (16-24 year olds) that someone their own age is being affected and interested by videogames. This will affect them as they will feel involved in the documentary as they will feel like this impacts them and other people their age. If it was an older person in their 40's playing the games for example, they will feel less engaged in the documentary, as the events that are happening on screen dont impact people their own age. That's why I am featuring a young person in my documentary. So I wanted to capture this with an Over the shoulder shot so that way you see the person playing the games, and the videogame on screen within the same shot so you can clearly see that they are playing videogames.

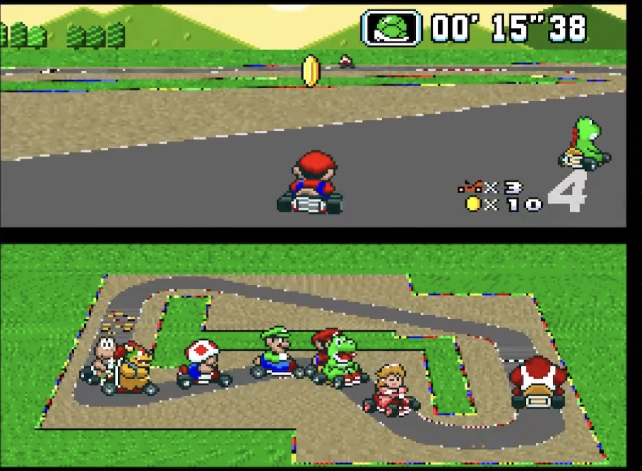
I wanted to capture some gameplay as an up close shot so only the TV screen was in the shot. So i had to position the tripod on the arm of the chair and wrap the tripod legs around the arm or the chair to keep it still and adjust the zoom of the camera so only the TV is in the shot. So when it is recorded it looks like a screen recording. Since it is an older console, i couldn't screen record the game play, so this is the best i could do. The phone handheld tripod really helped the camera stay still to help the camera stay still.
After Trying the Over the shoulder shot I was wondering if I could get another shot a bit like it where i get the person and TV with gameplay in the same shot. So I positioned the tripod on the windowsill and aimed the camera down slightly so that way i could get the Person and the TV in the shot frame. To test this, I looked through the camera and placed the chair in the shot and used that as a guide as i then knew that's where I would be in the shot. So then i hit record, sat in the chair and got the gameplay, and in the end the shot worked really well and came out the way I imagined it. This wasn't apart of the plan for my shot angles at first, but I thought of the idea during filming and experimented with it and then went along with it. I want to try to use this camera angle with the the other consoles featured later on in the documentary. I repeated this shot using other Super Nintendo games.

As well as using a shot Of the camera focused up on just the TV screen alone, i wanted to get a wider shot where you could see the TV and console on the desk. This is to show the audience the realism of the footage that it was played on the Console and that i didn't just get footage of the internet. But also it helps show the audience an idea on what the console looks like and how the games look on that console. But also the audience can see what games are being played on what console, as throughout the documentary, I will be using different console so this way they can see what game is being played on what console. I then decided to decorate around the shot by putting other games next to the console and putting an artificial plant next to the TV. I then repeat this shot for multiple games for the Super nintendo. This shot will look good when it is switched between the close up shot of the TV screen and the Side shot and Over the shoulder shot as shown earlier.
Day 2- Friday 21st April
For this day, this was a lot more simple than the first day shooting. This is because i only needed to get the shots of the gameplay on screen, so i didn't need to capture the same thing from 3 or 4 different camera angles. For the more advanced game consoles, i have the ability to screen record the gameplay so that makes things easier. For the older consoles i set up a tripod and lined the camera up with the screen. The reason why I am doing a gameplay montage at the beginning of my documentary is because it willingly last a minute or 2 long but it will quickly show the advancement of videogames over the years, starting with the first videogames at the start and working its way up to the most modern newest games. This will wow the audience and show them how much better the technology is and how the technological advancement obviously affects young people as they are mind blown by the improvement. The improvement in quality of games in the montage will show this. it then grips the audience to want to watch the entire documentary.


When I was playing the games, it took a few tries to get the gameplay looking right and looking entertaining as i didn't want to include clips where not much were going on in the games. I will be repeating this same camera technique for multiple games as well for this montage with the more modern games as well.
Day 3- Sunday 23rd April
Today, i wanted to gather Interviews to be featured in the beginning of the documentary when I am talking about some of the first video games. For this, I planned to use my dad as he was around my age when video game consoles first came about. And the clients requirements is to show how technology affects young people aged 16-24 year olds, so I thought this would be perfect to show in the documentary how the video game technology affected him when he was that age. In the interview i ask him many questions to potentially be used in multiple chapters of the documentary. Mainly things like: what was your earliest video game memory?
How did that technology affect you at the time?
What was your favourite video game growing up?
What was the first console you played on and how did the technology affect you or blow your mind at the time?
How old were you when you played the Super Nintendo (SNES)?
I thought these questions were important to the brief to show how technology is impacting young people in the past and then compare it to present day in the middle to end of the documentary and interview people my age and this will help to show how the technology has evolved. This will also help to entertain my present target audience who haunt played these older video game consoles to educate them on what it was like back then and how different it is to present day.
For the Camera techniques and mis en sene during the interviews, I wanted to keep the background quite plain, so I picked a plain part of the wall, but included a poster in the background to add a vague bit of detail but not too much so it doesn't distract the audience from the interview and watching it. To keep with the style of a participatory documentary, where the director is more involved within the documentary, I got my dad to look at me instead of the camera so it looked more like a conversation rather than him on his own talking into a camera. That way it keeps the director more involved even though I am not on screen and not the main focus. In some existing documentaries they get the person to look at the camera in interviews but i think that looks too intimidating as this isn't a stressful situation, as in this case it is just a conversation where he is talking about his experience with video game technology.
I then looked on Youtube to gather lots of archive footage of young people playing in the arcades. This is to fit in with the segment where i am talking about kids in the 80s going to the arcades to play videogames rather than playing them at home as videogame machines weren't known at the time. This will be at the start of the documentary as i want to show how the vidogame technology has impacted people through the decades. This part of my documentary will be mostly archive footage since i don't have the game consoles to gather the footage off myself. Also the arcades today are not like how they were back in the 80's. Since I didn't take the footage, I couldn't control the camera angles, but tried to get footage from multiple camera angles anyway.
In the section where I am talking about the Famicom which was only released in Japan, I was able to gather some footage of a Japanese TV advert of people using the console. This is to give my young audience an idea on what the console looked like at the time and how it worked. I thought this section of the advert worked best as it shows an over the shoulder shot of someone using the console, but also it earlier showed close up shots of the console and the games.
Day 4- N64 and Gamecube- Saturday 29th April
Since the previous log, it has been a week, and since then, I had decided to start to edit the footage I had taken so far to not complicating things by having a 15 minute documentary worth of footage images voice overs and clips and spending ages gathering and organising the clips. So i decided to edit what i had done so far so I could start to make progress in my editing and post production. After that had been done , I started to gather footage for the Nintendo 64 and Gamecube era sections of the documentary. For this i decided to take inspiration from previous recording days as to what shots to use as its footage of me sitting down playing the games. Even though im using different consoles, the general idea is the same as I am doing the same shot types. As a result, I could learn from my mistakes with previous shooting days, changing what therefore went wrong, and continuing and improvising on what went right.
First I wanted to get screen recorded footage of the games. For example with super mario 64, this is a Nintendo 64 game, however it got remade to the Nintendo switch, so for purposes of the documentary in order to get the footage, I screen recorded footage off my Nintendo switch and transferred it to my phone. The plan is to get some archive footage of someone else playing the game and then cut to this.
Im showing a second example as for the other close up/ screen recorded shots of other games i got I got the shot using an official Nintendo 64 in my own home. In order to Make it look like it was screen recorded, I put a box on my chair, put my phone and tripod on the box, and line it up with the TV frame which took ages to set up and line up perfectly so was maybe one of my most difficult shots to get and replicate with other games. I then had to Zoom in on the TV so only the game was in the frame. In the end it look very perfect almost if it was screen recorded. This helps me find a way around the fact its older hardware and I cant screen record on it.
Here I create the shot the same way i did with the last shot by putting my phone tripod on a box and putting the box on my chair, but this time i did this from a wider angle by zooming the camera out. This is to show my audience that this footage is on the console, the nintendo 64. This gives them an idea on what the console looks like and how the game runs on the console.
To introduce the console when I am talking about it at the beginning of this segment, I got a zoom out panning shot of the console to show the audience what it looks like up close in detail incase they haven't seen it before
Since it worked really well in my other clips, I got a shot of me inserting the game cartridge before it shows the gameplay. Or i might put this in the section where i am talking about the console running games on cartridges.
For this part of the documentary, I thought it would look better if i show my Dad playing the games rather than me. This is to vary it up a bit rather the documentary showing mostly me. This is also to go along with the interviews of him talking about his experience of him using this as a young adult. For the shots I started off by doing the side shots i used in the other segment. This is good as it shows the perspective of him playing the game and the tv showing the gameplay.
I wanted to experiment with an OTS shot since here i have more control over the camera angles I use since i can hold the camera rather than placing the camera somewhere while i record. So here i was able to stand and hold the camera over his shoulder while I record the footage.
I wanted to experiment of some close shots of the individual in the shot as lots of documentaries of videogame documentaries use these type of medium shots to show peoples face expressions which gives people in the documentaries some personality.
I followed this up with a close up. I probably wont use both shots but thought i would experiment with different shot types to see what works best.
GAMECUBE
Just like with previous sections, I used a box on my chair and placed a tripod on top in order to get the shot frame on the TV so it looks screen recorded, This is to focus the users attention as you can only see the gameplay. This will then cut to other shots of me playing or a medium shot showing the tv, table and console.
I used an over the shoulder shot here. The shot is slightly lower than normal but this is due to me not having a fully size tripod to achieve this angle. However, this still looks very similar and achieves the right angle and affect. It shows my perspective of playing the game by putting the camera behind me. I wanted to focus the frame of the camera to show a bit of me as well as the table and TV so you could see the console. The camera frame cuts off at the bottom of the table and I think this looks good.
Just like with the SNES and N64, I wanted the screen recorded screen zoom type shot as i like to call it, to cut to a slightly zoomed out version of this shot which shows the console and TV on the desk. this is to decorate the scene with the right props by putting appropriate things on the desk to have little details in the shot for the audience to notice.
Just like the previous sections, I used this side shot while experimenting with different shots and figured out this worked really well. nothing much else to add as the reasoning behind is the same but im repeating it with a different console and game.
With the other consoles, I liked the idea of having my camera touching the console so it does this outward zoom as the camera focuses on the console. I used the phone tripod and handheld it to pan round so the audience get a good view of what the console looks like.
For this part, I try to emphasise how this console starts to use disks rather than the other consoles that use cartridges. To show this, i thought id get a shot to show this to show how this console works and the fact these are mini disks as oppose to regular disks.
Day 5- Tuesday 4th May
today I have been getting footage from the Wii console to show my audience a few of the games and how the console worked. In some shots I tried to stand up to show the interactive aspect of it so they could see there was motion controls involved.I got a shot of the console to show my audience up close what the console looks like up close and did a zoom out by putting my camera on the table and zooming out and auto focusing. This is something i have seen in youtube videos, so it is a shot type loads of young people are familiar with and will entertain them.
I then screen recorded mario galaxy gameplay. I did this as even though its a Wii game, it got brought to the switch so this allowed me to screen record it and send it to my phone.
For each Wii game, I got up medium close up shots of me playing each game. This is so you can see how each game is played as each game has a different controller scheme since the console uses motion controls. This educates my audience on how this works.
just like the other segments, I decided to use an over the shoulder shot to show the gameplay and me in the shot. This shows you the experience from my first person perspective. I put the console and games on the desk to decorate the set a bit so it looks detailed.
i got a very similar shot as before however its from the side so you see the game and me from a side perspective. The set is made the same to show continuity in the scenes so it flows together. Between takes i wore the same clothes to show it set in the same day even though it was recorded on different days.
For all of these shots, i repeated the same shots for all the games and synchronised it together so the gameplay continues from the same point in the next shot so it flows.
Behind the scenes
I then took some behind the scenes shots to show how I created the perfect angle for every shot for each scene. I created an example for every shot type, however it was repeated for every console and game. Here you can see how the equipment was set up and arranged to create each shot.
Side shot
This is how I created the side shot. I got the phone tripod that i bought and mentioned in my equipment list section. I basically positioned the tripod on the windowsill in my bedroom. I then lined the camera up so it showed the chair and TV in the shot and that how i new that i would fit in the shot. I lined it up with the top of the chair so i knew my head would be in the shot. It worked out really well and went according to my plan.
Screen recorded shot
In order to create the affect that the gameplay has been screen recorded off the console, I put a cardboard box on my chair at the point in was sitting. I then lined the camera up with the frame of the TV. I then zoomed so the camera frame perfectly lined up with the TV so it showed the on screen gameplay.
OTS shot
Insert Shot
I wanted to make an Over the shoulder shot as it is included in lots of previous gameplay documentaries. This shows a first person perspective as it shows me and the gameplay. So you can see its actually me playing the game.
I then wanted it to cut to the controller being used so i created an insert shot. I did this by placing the tripod on my knee and aimed the camera at my hands to show me holding the controller and pressing the buttons.
Medium shot/ front shot
Finally I wanted to create a medium and up close shot of me holding the controller. This is to create a sense of immersion as you can see my facial expressions while im playing so it gives the characters in the documentary some emotion and character. this really shows character expressions.


Comments
Post a Comment